
Gluten-Free Cinnamon Roll Cream Scones
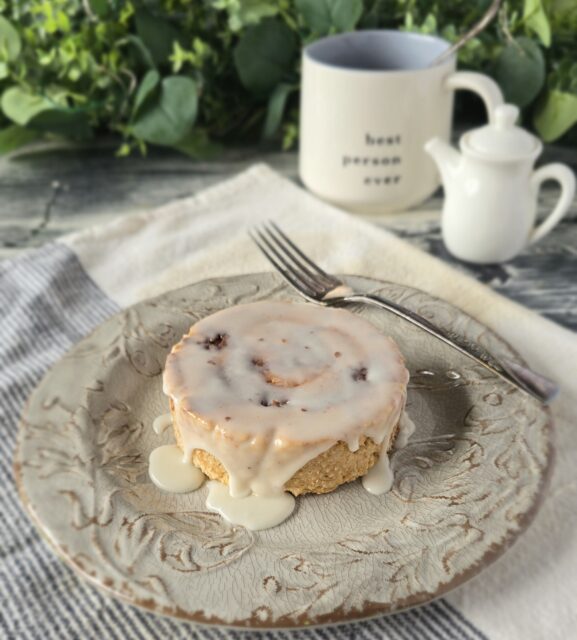
These Gluten-Free Cinnamon Roll Cream Scones combine one of my favorite scone recipes with everything I love about a cinnamon roll: a slightly gooey cinnamon sugar ribbon, tender dough, and vanilla icing over the top.
I created them as recipe #3 in my Cinnamon Roll-Inspired Instagram Series, and they may be one of my favorites so far.
I’ve been making cream scones for over 25 years. They were one of the first breakfast pastries I sold in my bakeries, and after all these years, cream scones are still my favorite style of scone to make.
They’re incredibly easy, too.
Unlike many other traditional scone recipes, cream scones don’t require cutting cold butter into the flour. The heavy cream provides both the fat and moisture for the dough, so everything comes together quickly by hand.
For this cinnamon roll version, I added a cinnamon sugar filling through the center and finished the baked scones with vanilla icing. You get the crunchy edges and tender interior I love in a cream scone, with a cinnamon swirl running through every bite.
What Are Cream Scones?
Cream scones are made with heavy cream rather than relying on pieces of cold butter worked into the flour.
That makes them especially simple to prepare. There’s no pastry cutter, food processor, or lengthy butter-cutting step involved. I mix the dough just until it comes together and usually finish it gently with my hands.
The key is resisting the urge to make the dough perfectly smooth. A slightly rough, clumpy dough is exactly what you want. Overworking scone dough can make the finished scones heavier rather than tender.
If you’ve struggled with traditional scone recipes, cream scones are a wonderful place to start.
Turning My Classic Cream Scones Into Cinnamon Roll Scones
The base for this recipe comes from my classic cream scones, a recipe I’ve been making professionally for decades.
For this version, instead of adding fruit or another mix-in directly to the dough, I pat the dough into a rectangle and spread a simple cinnamon filling over the surface.
The dough is then cut into strips and each strip is rolled up like a cinnamon roll.
Don’t worry if the dough cracks a little while you roll it. Scone dough is more delicate than a yeast-raised cinnamon roll dough, and a few cracks are completely normal. Some cinnamon filling may escape along the way, too.
Once baked and iced, those imperfect little rolls turn into beautiful cinnamon roll-inspired scones.
Do I Need Ring Molds to Make These Scones?
Absolutely not.
I used 4-inch ring molds for the scones you see in my photos and video because I wanted a very round, bakery-style appearance.
The rings are purely for presentation.
Without ring molds, place the rolled scones directly onto a parchment-lined baking sheet and gently flatten them before baking. They’ll have a more rustic shape similar to a traditional scone and taste every bit as good.
If you do use rings and want the exceptionally smooth, flat appearance shown in my photos, place parchment over the filled rings and set another sheet pan on top during the first half of baking.
Remove the upper pan and parchment halfway through the bake so the scones can finish uncovered.
My Trick for Perfectly Round Bakery-Style Scones
Here’s another little pastry-chef trick if appearance is important to you.
After the ring-mold scones have cooled, carefully release them from the molds. If needed, run a thin knife around the inside edge of each ring.
Then turn the scones upside down before icing them.
The surface that baked against the sheet pan becomes the top, giving you an exceptionally smooth, perfectly round surface for the icing.
Of course, you can skip every bit of this if you’re making them for Saturday breakfast and simply want a really delicious scone.
Can I Make These Cinnamon Roll Scones Less Sweet?
Yes.
My original cream scone dough contains brown sugar, but this variation also gets sweetness from the cinnamon filling and vanilla icing.
If you prefer a less-sweet breakfast scone, reduce the brown sugar in the dough by as much as half. The recipe works with anywhere from 112 to 224 grams of brown sugar.
I would adjust the dough rather than eliminating the cinnamon filling because that swirl is what gives these their cinnamon roll character.
For a lower-sugar option, my favorite approach is to use 50% maple sugar and 50% allulose or an allulose–monk fruit blend (Impact is my personal favorite); you can also use the allulose–monk fruit blend on its own or combine it 50/50 with brown sugar, although I prefer the 50/50 maple sugar blend for the best flavor and texture.
Maple Sugar or Brown Sugar for the Cinnamon Filling?
Either works.
Maple sugar gives the filling a slightly deeper flavor that is especially good with cinnamon, while brown sugar gives you that familiar classic cinnamon roll flavor.
Use whichever you have or prefer.
Tips for Tender Gluten-Free Cream Scones
The amount of heavy cream may vary slightly depending on the gluten-free flour blend you use. Begin with the lower amount listed in the recipe and add more only if the dough still has dry, crumbly areas that won’t come together.
Mix gently and stop once there are no obvious dry pockets of flour.
When shaping, expect the dough to feel softer and more delicate than a traditional wheat dough. Small cracks while rolling are fine and do not need to be repaired perfectly.
Allowing the shaped scones to rest for 20 to 30 minutes while the oven preheats also gives the gluten-free flour time to hydrate before baking.
More Cinnamon Roll-Inspired Gluten-Free Recipes
These scones were created as part of my Cinnamon Roll-Inspired Series, where I take those familiar cinnamon roll flavors and use them in completely different gluten-free recipes.
If you haven’t tried them yet, check out my Gluten-Free Cinnamon Roll Muffins, with a cinnamon swirl layered throughout the muffin instead of one big pocket in the center.
You can also find my original Cream Scones on the site if you’d like a classic version that you can customize with your favorite fruits and mix-ins.
Want to Learn More About Making Gluten-Free Scones?
If you want to understand the techniques behind great gluten-free biscuits and scones rather than simply following a recipe, check out my Biscuits and Scones class.
I walk you through the methods, ingredient choices, troubleshooting, and variations that help you get consistent results at home.
For ongoing help with all kinds of gluten-free baking, my Gluten-Free Baking Bootcamp includes my complete class library along with live support, recipe conversion help, and a community of experienced gluten-free bakers.
Learn More About Bootcamp Here
Gluten-Free Cinnamon Roll Cream Scones
Ingredients
Cream Scone Dough
- 500 grams gluten-free 1-to-1 flour blend
- 224 grams brown sugar or maple sugar*
- 1 tablespoon baking powder
- 1 teaspoon salt
- 360 -400 grams heavy cream cold
Cinnamon Roll Filling
- 100 grams maple sugar or brown sugar
- 1 tablespoon ground cinnamon
- 2 tablespoons heavy cream
Vanilla Icing
- 150 grams powdered sugar
- 60 grams heavy cream
- 1 teaspoon vanilla bean paste or 1½ teaspoons vanilla extract
Instructions
Make the Scone Dough
- In a large bowl, combine the gluten-free flour, brown sugar, baking powder, and salt. Whisk well to break up any lumps and evenly combine the ingredients.
- Add approximately half of the cold heavy cream and stir a few times. Add the remaining cream and continue stirring just until a mostly cohesive dough forms.
- Finish bringing the dough together gently by hand until there are no noticeable dry spots. Avoid overworking the dough. The finished dough should still look slightly rough and clumpy rather than completely smooth.
Make the Cinnamon Filling
- Combine the maple sugar or brown sugar, cinnamon, and heavy cream. Mix until evenly combined.
Shape the Cinnamon Roll Scones
- Transfer the dough to a lightly floured work surface. Gently pat it into a rectangle approximately 8 inches wide by 10 inches tall.
- Spread the cinnamon filling evenly over the dough.
- Cut the dough vertically into 8 strips, approximately 1 inch wide each.
- Starting at one end, gently roll each strip up like a cinnamon roll. The gluten-free dough may crack slightly as you roll it, and some of the filling may escape. That is completely fine. Gently shape each roll with your hands as needed.
- If Using 4-Inch Ring Molds
- Arrange eight 4-inch ring molds on a parchment-lined sheet pan.
- Place one rolled scone inside each ring. Gently press and flatten the dough until it reaches the edges of the mold and is level with the height of the ring.
- Place a sheet of parchment paper over the tops of the molds. Set a second sheet pan directly on top. This helps create perfectly flat tops.
- If Not Using Ring Molds
- Place the rolled scones directly onto a parchment-lined sheet pan, leaving space between them.
- Gently flatten each scone to your desired thickness. They will bake with a more rustic, traditional scone appearance.
Rest and Bake
- Preheat the oven to 350°F.
- Let the shaped scones rest for 20–30 minutes while the oven preheats. If your kitchen is very warm, place them in the refrigerator during the resting period.
- Bake for approximately 25 minutes, rotating the pan halfway through baking.
- If using ring molds, remove the top sheet pan and parchment paper halfway through baking. Return the scones to the oven uncovered to finish baking.
- The scones are finished when they are baked through with a light golden-brown crust.
Cool and Unmold
- Allow the scones to cool.
- If using ring molds, carefully remove each scone from its mold. You may need to run a thin knife around the inside edge of the ring to release it.
- For the perfectly round bakery-style appearance shown in the photos and video, invert each scone after removing it from the mold so the bottom becomes the top.
Make the Vanilla Icing
- Whisk together the powdered sugar, heavy cream, and vanilla bean paste or vanilla extract until smooth.
- Spoon or drizzle the icing over the cooled scones. Allow the icing to set before serving, if desired.
