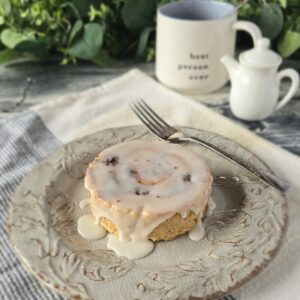
Gluten-Free Cinnamon Roll Cream Scones
Tender gluten-free cream scones with crisp edges and a ribbon of cinnamon roll filling spiraled through the center, finished with a simple vanilla icing. These scones are made without cutting in butter, making them incredibly easy to put together.
Servings: 8 Scones
Calories: 603kcal
Ingredients
Cream Scone Dough
- 500 grams gluten-free 1-to-1 flour blend
- 224 grams brown sugar or maple sugar*
- 1 tablespoon baking powder
- 1 teaspoon salt
- 360 -400 grams heavy cream cold
Cinnamon Roll Filling
- 100 grams maple sugar or brown sugar
- 1 tablespoon ground cinnamon
- 2 tablespoons heavy cream
Vanilla Icing
- 150 grams powdered sugar
- 60 grams heavy cream
- 1 teaspoon vanilla bean paste or 1½ teaspoons vanilla extract
Instructions
Make the Scone Dough
- In a large bowl, combine the gluten-free flour, brown sugar, baking powder, and salt. Whisk well to break up any lumps and evenly combine the ingredients.
- Add approximately half of the cold heavy cream and stir a few times. Add the remaining cream and continue stirring just until a mostly cohesive dough forms.
- Finish bringing the dough together gently by hand until there are no noticeable dry spots. Avoid overworking the dough. The finished dough should still look slightly rough and clumpy rather than completely smooth.
Make the Cinnamon Filling
- Combine the maple sugar or brown sugar, cinnamon, and heavy cream. Mix until evenly combined.
Shape the Cinnamon Roll Scones
- Transfer the dough to a lightly floured work surface. Gently pat it into a rectangle approximately 8 inches wide by 10 inches tall.
- Spread the cinnamon filling evenly over the dough.
- Cut the dough vertically into 8 strips, approximately 1 inch wide each.
- Starting at one end, gently roll each strip up like a cinnamon roll. The gluten-free dough may crack slightly as you roll it, and some of the filling may escape. That is completely fine. Gently shape each roll with your hands as needed.
- If Using 4-Inch Ring Molds
- Arrange eight 4-inch ring molds on a parchment-lined sheet pan.
- Place one rolled scone inside each ring. Gently press and flatten the dough until it reaches the edges of the mold and is level with the height of the ring.
- Place a sheet of parchment paper over the tops of the molds. Set a second sheet pan directly on top. This helps create perfectly flat tops.
- If Not Using Ring Molds
- Place the rolled scones directly onto a parchment-lined sheet pan, leaving space between them.
- Gently flatten each scone to your desired thickness. They will bake with a more rustic, traditional scone appearance.
Rest and Bake
- Preheat the oven to 350°F.
- Let the shaped scones rest for 20–30 minutes while the oven preheats. If your kitchen is very warm, place them in the refrigerator during the resting period.
- Bake for approximately 25 minutes, rotating the pan halfway through baking.
- If using ring molds, remove the top sheet pan and parchment paper halfway through baking. Return the scones to the oven uncovered to finish baking.
- The scones are finished when they are baked through with a light golden-brown crust.
Cool and Unmold
- Allow the scones to cool.
- If using ring molds, carefully remove each scone from its mold. You may need to run a thin knife around the inside edge of the ring to release it.
- For the perfectly round bakery-style appearance shown in the photos and video, invert each scone after removing it from the mold so the bottom becomes the top.
Make the Vanilla Icing
- Whisk together the powdered sugar, heavy cream, and vanilla bean paste or vanilla extract until smooth.
- Spoon or drizzle the icing over the cooled scones. Allow the icing to set before serving, if desired.
Notes
Notes
**Sugar in the dough:** Because these scones have the additional cinnamon filling and vanilla icing, you can reduce the brown sugar in the scone dough by up to one half if you prefer a less-sweet scone. Use anywhere from 112–224 grams brown sugar, depending on your preference.
**Heavy cream:** Start with the lesser amount of cream when mixing the dough. Add additional cream as needed until there are no dry, crumbly areas.
**Do not overmix:** I usually finish mixing cream-scone dough with my hands, gently squeezing it together in clumps. The goal is a cohesive but somewhat rough dough. Overworking it can negatively affect the finished texture.
**Ring molds are optional:** The 4-inch rings create the perfectly round, bakery-style scones shown in the photos and video. You can bake the rolled scones directly on parchment for a more rustic appearance.
**For especially flat tops:** When using rings, parchment and a second sheet pan placed over the molds during the first half of baking will keep the surface flat. Remove both halfway through baking so the scones can finish browning
Nutrition
Serving: 1scone | Calories: 603kcal | Carbohydrates: 101g | Protein: 7g | Fat: 22g | Saturated Fat: 13g | Polyunsaturated Fat: 1g | Monounsaturated Fat: 5g | Cholesterol: 64mg | Sodium: 317mg | Potassium: 281mg | Fiber: 6g | Sugar: 60g | Vitamin A: 830IU | Vitamin C: 0.4mg | Calcium: 184mg | Iron: 3mg